This tutorial is intended for all LinkedIn users; new or seasoned. In our first tutorial in this series, we talked about the Profile area of Privacy & Settings. You can read that tutorial here. This second instalment is about the Communications area of LinkedIn’s Privacy & Settings.
Once you log-in to your LinkedIn account, click on your profile’s avatar/image, and then choose Privacy & Settings. Following that, choose the Communications tab. This post concerns itself with Communications settings.

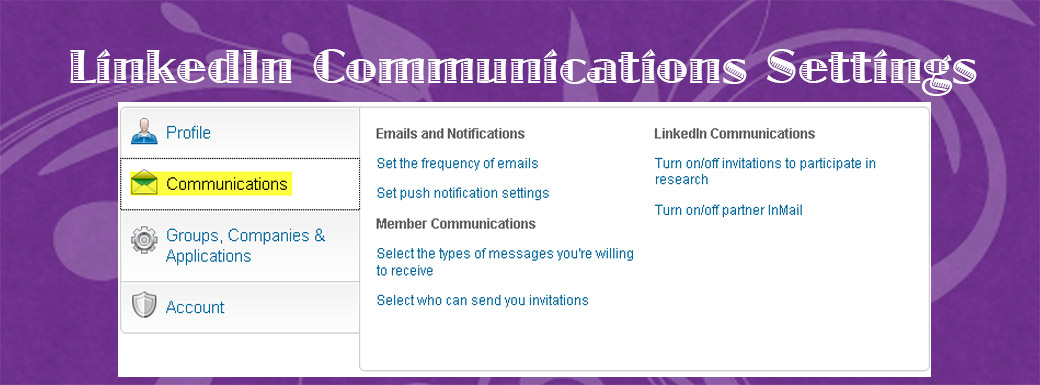
The Communications tab in your account settings has three major sections:
- Emails and Notifications
- Member Communications
- LinkedIn Communications
We’ll examine each section next.
LinkedIn: Emails and Notifications
 Click the link for Set the frequency of emails to view or change the settings for all LinkedIn messages, whether received from other members, Groups you belong to, or LinkedIn. Each of the five links in the Email frequency section is clickable, and each reveals several areas that can be changed through convenient drop-down menus. Here’s what one screen looks like, showing the last choice (Job suggestions from connections) with its drop-down menu available.
For the majority of the choices here, three options are allowed: Individual Email, Weekly Digest Email, or No Email. What works for you is what’s right or wrong. Don’t forget to click the blue button! ![]()
LinkedIn: Push notifications settings
Not to insult anyone’s intelligence, but some of our readers may not get “push”. In general, when referring to e-mail or other notifications that appear on any of your devices (more particularly, phones), push notifications mean that whether or not you’re actively using an application, you will be informed of new messages or events. You’ll need to make a judgement call on this one. You can change the settings for either Messages from other members or for Notifications.
LinkedIn: Member Communications
In the Member Communications are, you may view or change two types of messages:
- Select the types of messages you’re willing to receive
- Select who can send you invitations
LinkedIn: Select the types of messages you’re willing to receive
 Here, in addition to having two radio buttons to choose from (note that these are mutually exclusive), you have several check boxes you can check—as many as you like—plus you have an area where you can type ‘default’ comments that everyone will see when they try to contact you.
We suggest you click the first radio button, shown in the figure as “Recommended”, as it gives you the most coverage and exposure. In terms of the check boxes, you’ll need to decide what opportunities you’re informed of. Finally, make a careful decision about any ‘automatic’ reply text you use. Click the See examples link for three distinct ideas about what you might type here. Just remember, some people are put off by these kinds of notices. Click Save changes when you’re done.
LinkedIn: Select who can send you invitations
Do you want (or need) more connections? We recommend that you accept as many legitimate, sincere, and/or helpful invitations to connect as you can. LinkedIn has networks of networks, and in short order you can potentially reach thousands or tens of thousands of business people. Click this link to see the three radio button (mutually exclusive) choices you can make.
LinkedIn Settings Communications
So it’s obvious these messages are from LinkedIn, which are divided into two sub-choices:
- Turn on/off invitations to participate in research
- Turn on/off partner InMail
LinkedIn: Turn on/off invitations to participate in research
When you click this link, you’re presented with a single check box option: whether or not you want to participate in occasional LinkedIn market research studies.
LinkedIn: Turn on/off partner InMail
InMail is a LinkedIn Premium account feature (i.e., a paid feature). The two major advantages in using InMail are that you can contact other LinkedIn members you are not connected with (no invitations are necessary), and, unusual in this kind of situation, the service comes with limited guarantees from LinkedIn: “If you don’t get a response in 7 days, we’ll give you another InMail to send.” Note: That said, the number of InMails you are allowed to send is quite limited, so weigh out the advantages. There are three levels of premium membership: Business, Business Plus, and Executive. The first allows only three InMail messages per month, at a cost (for premium membership) of approximately $25 per month. The two higher levels allow for 10, and 25 InMail messages per month respectively, at costs for the membership of approximately $50 and $80 per month.
Click the link and you’re presented with two Partner InMail choices, by way of check boxes. The first allows you to decide if you’re OK with LinkedIn’s marketing partners sending you informational or promotional information. The second choice allows you to decide if you are OK with their hiring campaign partners to send you the same kinds of information.
In summary, we recommend you take the time to explore your LinkedIn Privacy & Settings. You may be quite happy with many of the defaults. On the other hand, you may feel some of your information or choices should be more private than they’re current settings allow for.
CONNECT:SHARE: