There are a variety of free tools one can use to take what are commonly known as screen captures: a screen capture is literally a ‘picture’ of all or part of your computer screen. Windows Print Screen has been around forever. On full-sized QWERTY keyboards, the PrintScr key is usually right beside the F12 key. (Same position, but it may be named PrtSc on a laptop or notebook.) Press the key once to capture, to Windows clipboard, an image of anything on your screen (any window, object, or series of windows or objects). Once an image has been captured, you can paste it into most any open application by pressing CTRL+V (a shortcut for Paste). Here’s a tip: if you have several objects/windows on your screen, bring the current one into ‘focus’ (a term used in web development programming) by clicking it once. Then press ALT+PrintScr to capture just that window.
But what if you want to capture something like the following (part of the Word 2010 Ribbon):

Of course, there’s more than one way to grab a shot like that. In fact, even Word has a Screenshot button (Insert tab, Illustrations group). Forgetting about Word’s Screenshot button, if you had Word open, and captured the entire screen using PrintScr, you could paste the results into a blank Word document, and then crop the image. But for on-the-fly versatility, and for an easy way to save your screen capture in one of several different image formats, Windows Vista and Windows 7 users should consider using the Snipping Tool.
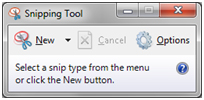
 Look to the right, and you can see what the Snipping Tool application (app) looks like. Pretty simple, isn’t it? The easiest way to fire up this app is by clicking Windows Start button, then starting to type “snippet” into the Search box. For me, the program appears at the top of the Start menu before I get to “sni…”. Initially, it is greyed out: that means it’s ready to snip! All you do is use the mouse to ‘draw’ a box or rectangle around any part of the screen you can see. Once you let the mouse go, the app window reappears, and in it is your cool new screen capture!
So, no, you don’t need Snagit [I have this program too, and it’s fantastic] in order to grab a pretty good image of anything on the screen. And it gets better: once you’ve captured something, the Snipping Tool window allows you to instantly save the image in .JPG format (a common format for rich, scalable graphic images). Just click the Save button. You can, by the way, change the format by changing what you see in Save as type. If you want to use the image immediately, as I did in this document, you can simply click the Copy button, and then use CTRL+V (or Edit, Paste) in almost any application to paste it where your cursor is. Voilà!
The Snipping Tool is a great little free app that’s easy to use, and can be left minimized on Windows taskbar until you’re ready to use it. By the way, there are also some simple markup tools, if you wanted, say, to annotate or draw on the capture.
(…and for those of you who can’t get THAT song out of your head now… watch the video here. ~ Pat)
CONNECT:SHARE: